
Special Moments Inspiration | Special Day Card with Hussena
on June 05, 2018

Special Moments Inspiration | Special Day Card with Hussena

Hello everyone! This is Hussena from Quill and Punch Works, and I am really excited and honoured to be guesting today on the Spellbinders Paper Arts blog. I have a card to share today I made using several dies from the Special Moments collection by Marisa Job. This is a spectacular collection with a wide variety of gorgeous, intricate dies. I love how there a number of different dies in this collection, and there is something for everyone! Here's a look at my card:
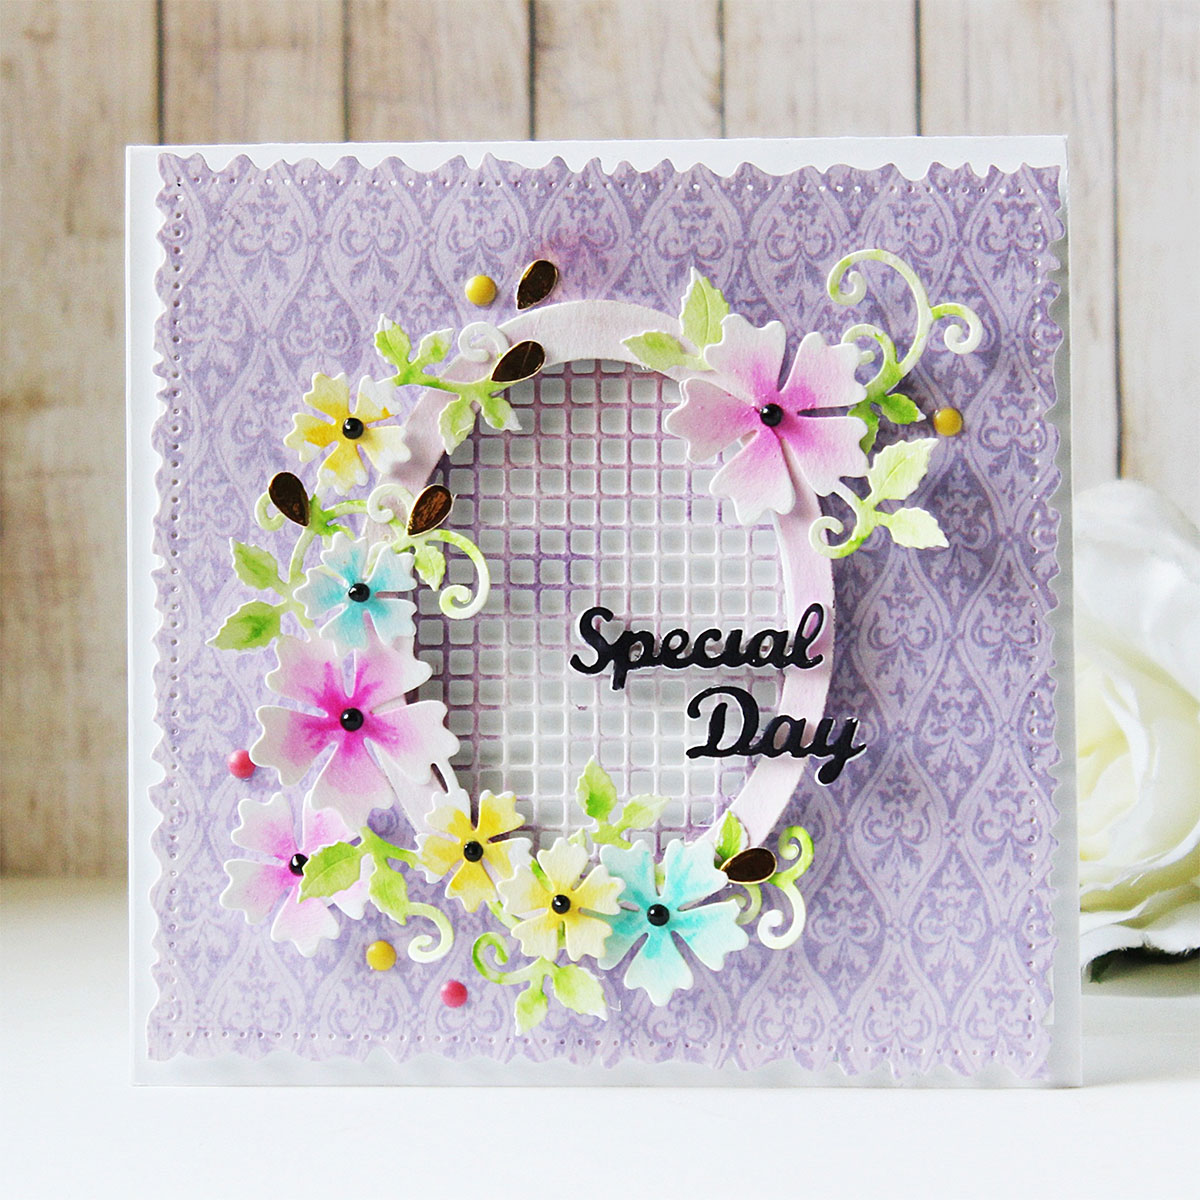
Special Moments Collection by Marisa Job - Inspiration | Special Day Card by Hussena for Spellbinders. Featuring: S5-374 Special Day Frame, S5-378 Floral Oval, S7-215 Vintage Stitched Squares dies. #spellbinders #neverstopmaking #diecutting #handmadecard

To create my card, I first started by die cutting the largest die from the Vintage Stitched Squares die set from a lilac patterned paper. I adhered this square piece on my card base.

Special Moments Collection by Marisa Job - Inspiration | Special Day Card by Hussena for Spellbinders. Featuring: S5-374 Special Day Frame, S5-378 Floral Oval, S7-215 Vintage Stitched Squares dies. #spellbinders #neverstopmaking #diecutting #handmadecard

To embellish my card, I die cut the lattice oval die from the Floral Oval die set. I used White 80 LBS cardstock for die cutting the oval. I also die cut the same die from some White Fun Foam so that I could pop the white die cut piece on the foam for added dimension. I lightly colored the frame using a light pink marker. I also added touches of purple ink here and there on the lattice frame so that it would highlight the pink.

Special Moments Collection by Marisa Job - Inspiration | Special Day Card by Hussena for Spellbinders. Featuring: S5-374 Special Day Frame, S5-378 Floral Oval, S7-215 Vintage Stitched Squares dies. #spellbinders #neverstopmaking #diecutting #handmadecard

I wanted this card to have a very light, fun, and whimsical look to it so I decided to create some simple handmade flowers to go with the frame! I used the flower crescent die from the Floral Oval die set to create the floral foliage around my frame. I die cut the flowers from white cardstock, colored the centers of each flower using different color markers, and added a black enamel dot to the centers. So simple yet pretty, isn't it?

Special Moments Collection by Marisa Job - Inspiration | Special Day Card by Hussena for Spellbinders. Featuring: S5-374 Special Day Frame, S5-378 Floral Oval, S7-215 Vintage Stitched Squares dies. #spellbinders #neverstopmaking #diecutting #handmadecard

The leaves were also lightly colored using green markers. I added some gold foiled buds here and there for added interest.

Special Moments Collection by Marisa Job - Inspiration | Special Day Card by Hussena for Spellbinders. Featuring: S5-374 Special Day Frame, S5-378 Floral Oval, S7-215 Vintage Stitched Squares dies. #spellbinders #neverstopmaking #diecutting #handmadecard

The Floral Oval die set also offers stand-alone flowers in case you don't want to use the entire flower crescent die, which I think is very thoughtful and well designed. I die cut the largest flower using the stand-alone piece and added it to the right side of my card to help balance my card design.

Special Moments Collection by Marisa Job - Inspiration | Special Day Card by Hussena for Spellbinders. Featuring: S5-374 Special Day Frame, S5-378 Floral Oval, S7-215 Vintage Stitched Squares dies. #spellbinders #neverstopmaking #diecutting #handmadecard

The Special Day sentiment comes from the Special Day Frame die set. I die cut it from black cardstock and popped it using white foam for dimension.

Special Moments Collection by Marisa Job - Inspiration | Special Day Card by Hussena for Spellbinders. Featuring: S5-374 Special Day Frame, S5-378 Floral Oval, S7-215 Vintage Stitched Squares dies. #spellbinders #neverstopmaking #diecutting #handmadecard

Here's a close up of the florals. I loved how this card turned out :) What do you think ?

Spellbinders Supplies:

Other supplies:

Neenah Solar White 110 LB cardstock, White 80 LBS Cardstock Sheets, Gold Foil Cardstock, Papericious Whimsical 12" X 12" Patterned Paper, White Fun Foam; Stick It Double Sided Adhesive Sheets; Adhesive: 3D Foam Squares, Tombow Mono Multi Liquid Glue, Double Sided Foam Tape; Zig Clean Color Real Brush Pens, Tombow Dual Brush Pen Set: 10 Pastel, Tonic Studios Nuvo Crystal Drops Thank you so much, for taking out time and reading my post. If you liked my card, please do leave me a comment below. Have a nice day everyone!

Leave a comment

Your email will not be published. Please note, comments need to be approved before they are published.

3 comments

Susie Lessard,

I just saw this card on Instagram and wanted to pop over and leave you a comment. I’ve seen all three posts here on the Spellbinders website. Beautiful cards – each and every one!

Pooja,

So beautiful !

Beverly Jordan,

So pretty and surreal!


  • How to Color BetterPress Scenes with Watercolor and Colored Pencils, BP-383, STNB-020, DC378

    AF724

    How to Color BetterPress Scenes with Watercolor and Colored Pencils

    Want to move beyond simple ink blending when using layering stencils? In this tutorial, you'll learn how to combine BetterPress printing, stencil coloring, watercolor painting, and colored pencil shading to create a detailed scenic card. By mixing coloring mediums, you can build additional texture, depth, and realism while using supplies you may already have in your craft room. This project features the Scenic Kyoto Press...

  • How to Use Reverse Foiling for Elegant Christmas Cards, BP-345, BP-314, S4-1452, BP-312, S5-526, S5-647

    BP-312

    How to Use Reverse Foiling for Elegant Christmas Cards

    Get more from your hot foil supplies by learning how to use the reverse foiling technique. In this step-by-step Christmas card tutorial, you'll create a beautiful snowflake background using leftover foil, then pair it with a dimensional poinsettia arrangement and festive sentiment. Reverse foiling is a fantastic way to reduce waste while creating an entirely different look from your original foiled design. Using the A2...

  • How to Make Felt Christmas Ornaments with Festive Felt Dies, S7-302, S7-303, S7-305, PE-104

    Categories:Die Cutting

    How to Make Felt Christmas Ornaments with Festive Felt Dies

    Create charming handmade felt Christmas ornaments using the Festive Felt Christmas Dies by Lollie & Grace. In this step-by-step tutorial, you'll learn how to die-cut felt, assemble layered ornament designs, add decorative stitching, embellish with sequins and beads, and finish your ornaments with hanging loops for Christmas decorating. This project is perfect for holiday crafters who enjoy working with felt and creating handmade decorations. These festive...







































